
[ English ]
วิธีแก้ “Visa issue date cannot be after the expected arrival date“
วิธีลงทะเบียนเข้าประเทศเวียดนาม (PAI)
การลงทะเบียน Digital Pre-Arrival Information (PAI) ก่อนเข้าประเทศเวียดนามล่วงหน้า ไม่มีค่าใช้จ่าย (ไม่ใช่การขอวีซ่า) และจำเป็นต้องทำก่อนเดินทางผ่านตม.เวียดนาม ทั้งคนไทยและชาวต่างชาติ ทำก่อนเดินทาง
⬩➤ ข้อควรรู้ก่อนลงทะเบียน ▼
🔸 ใครต้องทำบ้าง: ทุกคน ไม่ว่าจะเป็นคนไทยหรือชาวต่างชาติ (แม้คนไทยจะได้รับการยกเว้นวีซ่าอยู่แล้ว ก็ยังต้องลงทะเบียนตัวนี้ครับ)
🔸 ลงล่วงหน้าได้กี่วัน: ลงล่วงหน้าได้ ไม่เกิน 3 วัน ก่อนวันเดินทาง
🔸 คนละเรื่องกับวีซ่า: เอกสารนี้ไม่ใช่วีซ่า หากใครต้องการอยู่นานกว่า 30 วัน หรือชาวต่างชาติที่ต้องใช้วีซ่า จะต้องยื่นขอ e-Visa แยกต่างหากครับ
🔸 ทำเฉพาะขาเข้า
🔸 ฟรี ไม่มีค่าใช้จ่าย
ขั้นตอนการลงทะเบียน
⬩➤ 1. เข้าเว็บไซต์ทางการ ▼
- ค้นหาคำว่า “Vietnam pre arrival” บน Google
- สังเกตชื่อเว็บต้องมีคำว่า
immigration.gov.vnเท่านั้น (หากเป็นเว็บอื่นอาจไม่ใช่ของทางการ)
- เมื่อเข้าเว็บแล้ว ให้คลิกปุ่มสีน้ำเงิน “Create and Submit Pre-Arrival Information”
- ใส่รหัส Captcha เพื่อยืนยันตัวตน แล้วกด Verify
⬩➤ 2. เลือกสัญชาติและวันเดินทาง ▼
- เลือกสัญชาติ Thailand แล้วกด Next
- เลือกวันที่คาดว่าจะเดินทางเข้าเวียดนาม
⬩➤ 3. กรอกข้อมูลส่วนตัว ▼
- อัปโหลดรูปหน้าพาสปอร์ต: จะอัปโหลดเพื่อให้ระบบดึงข้อมูลให้อัตโนมัติ หรือจะพิมพ์กรอกเองก็ได้
- ประเภทพาสปอร์ต: เลือกประเภทพาสปอร์ตปกติ
- กรอกข้อมูลตามพาสปอร์ต: หมายเลขพาสปอร์ต, วันหมดอายุ, เพศ, ชื่อ-นามสกุล, และวันเกิด
- ข้อมูลติดต่อ: เบอร์โทรศัพท์ (รหัสประเทศ +66) และ อีเมลที่ใช้งานได้จริง (สำคัญมาก เพราะระบบจะส่ง QR Code ไปทางอีเมลนี้)
- ติ๊กยอมรับเงื่อนไข
⬩➤ 4. ข้อมูลวีซ่า ▼
- สำหรับคนไทย (อยู่ไม่เกิน 30 วัน): Visa type เลือกช่อง “Bilateral exemption” (ได้รับการยกเว้นวีซ่าตามข้อตกลงระหว่าง 2 ประเทศ)
- สำหรับผู้ที่ต้องใช้วีซ่า/e-Visa: เลือก Electronic visa (e-Visa) แล้วกรอกหมายเลข e-Visa วันหมดอายุ และสถานที่ออกเอกสาร
⬩➤ 5. ข้อมูลการเดินทาง (Trip Information) ▼
- ประเทศต้นทาง: เลือก Thailand
- จุดประสงค์: เลือก Travel (ท่องเที่ยว)
- การเดินทาง: เลือกเดินทางทางอากาศ
- สนามบินและที่พัก: เลือกสนามบินที่จะลง (เช่น SGN – โฮจิมินห์ หรือ HAN – ฮานอย) และเลือกโรงแรมแห่งแรกที่จะเข้าพัก
- วันที่เดินทางกลับ: กรอกวันคาดว่าจะออกจากเวียดนาม
⬩➤ 6. ยืนยันข้อมูลและยื่นเอกสาร ▼
- ตรวจสอบความถูกต้องของข้อมูลทั้งหมด
- ติ๊ก Confirm แล้วกด Submit
- ระบบจะส่งรหัส OTP ไปที่อีเมล ให้นำรหัส OTP มากดกรอกเพื่อยืนยัน
⬩➤ เมื่อลงทะเบียนเสร็จแล้ว ต้องทำอย่างไรต่อ? ▼
เมื่อทำรายการสำเร็จ จะได้รับอีเมลหัวข้อ “Your Vietnam pre-arrival submission is successful”
- ในอีเมลจะมี QR Code และ หมายเลขลงทะเบียน (Pre-arrival information number)
- วิธีใช้งาน: บันทึกรูป QR Code หรือเซฟไฟล์ PDF เก็บไว้ในโทรศัพท์มือถือ เพื่อเปิดแสดงให้เจ้าหน้าที่ดูเมื่อเดินทางถึงเวียดนามครับ
วิดีโอ: วิธีลงทะเบียนเข้าประเทศเวียดนาม (Pre-Arrival Form)
How to Register Vietnam Pre-Arrival Information (PAI)
Registering your Digital Pre-Arrival Information (PAI) before entering Vietnam is completely free (this is not a visa) and must be completed prior to passing through Immigration by both Thai and foreign travelers.
⬩➤ Key Information Before You Register ▼
🔸 Who needs to do this: Everyone, regardless of nationality (even citizens exempt from visas, such as Thai nationals, must complete this form).
🔸 When to submit: No more than 3 days before your travel date.
🔸 Separate from a visa: This document is not a visa. If you plan to stay longer than 30 days or hold a passport that requires a visa, you must apply for an e-Visa separately.
🔸 Required only for entry.
🔸 Free of charge
Step-by-Step Registration Guide
⬩➤ 1. Access the Official Website ▼
- Search for “Vietnam pre arrival” on Google.
- Make sure the domain ends with
gov.vn
- Click the blue button: “Create and Submit Pre-Arrival Information”.
- Enter the Captcha code to verify your identity, then click Verify.
⬩➤ 2. Select Nationality and Travel Date ▼
- Select your nationality (e.g., Thailand) and click Next.
- Select your scheduled arrival date in Vietnam.
⬩➤ 3. Fill in Personal Details ▼
- Upload Passport Photo Page: Upload an image for auto-fill, or manually type the details.
- Passport Type: Select standard passport.
- Passport Information: Enter your Passport Number, Expiration Date, Sex, Full Name, and Date of Birth.
- Contact Details: Enter your Phone Number (country code +66 for Thailand) and a valid Email Address (essential, as your QR Code will be sent here).
- Enter the Captcha code for verification and click Verify.
- Tick the box to accept the terms and conditions.
⬩➤ 4. Visa Information ▼
- Thai Travelers (staying under 30 days): Under Visa type, select “Bilateral exemption”.
- Travelers using an e-Visa: Select “Electronic visa (e-Visa)” and enter your e-Visa Number, Expiration Date, and Issuing Authority
⬩➤ 5. Trip Information ▼
- Country of Departure: Select Thailand (or your departure country).
- Purpose of Visit: Select Travel (Tourism).
- Mode of Transport: Select By Air.
- Airport & Accommodation: Choose your arrival airport (e.g., SGN – Ho Chi Minh City or HAN – Hanoi) and select your first hotel.
- Departure Date: Enter your intended date of departure from Vietnam.
⬩➤ 6. Confirm and Submit ▼
- Review all information for accuracy.
- Tick Confirm and click Submit.
- Enter the OTP sent to your email to confirm submission.
⬩➤ What to do after completing the registration? ▼
Upon successful submission, you will receive an email titled “Your Vietnam pre-arrival submission is successful.”
- This email will contain a QR Code and a Pre-arrival information number.
- How to use: Save the QR Code image or download the PDF file onto your mobile phone to present to officers upon arrival in Vietnam.
Video: How to Register Vietnam Pre-Arrival Information (PAI)
All videos are in Thai. English audio is available on YouTube (bottom right) → ⚙️ Settings → Audio track → English
📑 How to Apply for a Vietnam E-Visa Online: Who Needs a Visa?
วิธีแก้ปัญหาขึ้นข้อความว่า
“วันที่ออกวีซ่าต้องไม่เป็นวันที่หลังจากวันที่คาดว่าจะเดินทางเข้าประเทศ”
(How to fix the problem when the message
“Visa issue date cannot be after the expected arrival date”)
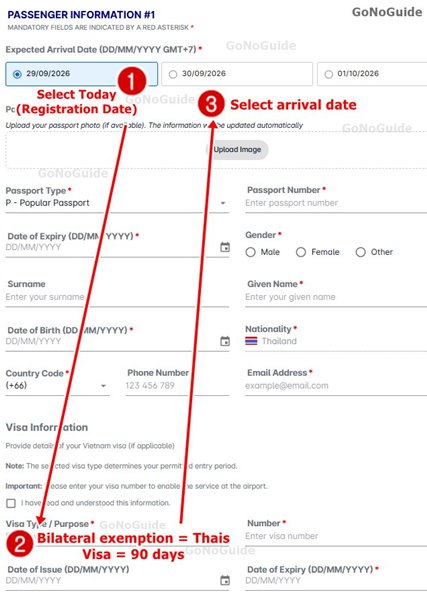
1. ช่อง Expected Arrival Date: ให้เลือกช่องแรกไปก่อน คือเลือกวันนี้ วันที่ลงทะเบียน
[ 1. Expected Arrival Date: First, select today’s date (the registration date). ]
2. จากนั้นเลื่อนลงมาที่ช่อง Visa Type: เลือกชนิดวีซ่าที่เราถือ ถ้าถือพาสปอร์ตไทย ฟรีวีซ่า ก็เลือก Billateral Exemption (ไม่ต้องเลือกวันที่)
[ 2. Visa Type: Scroll down to the Visa Type field and select the type of visa you have. If you are eligible for visa-free entry, select Bilateral Exemption. (Do not select the date below.) ]
3. จากนั้นเลื่อนขึ้นไปที่ช่อง Expected Arrival Date อีกครั้ง: เลือกวันที่จะเข้าเวียดนามจริงตามตั๋วบิน
[ 3. Expected Arrival Date:
Scroll back up to the Expected Arrival Date field and select your actual arrival date in Vietnam, according to your flight ticket.]